 |
| Photo slideshow made with Smilebox |
Sunday, 28 November 2010
Sunday, 21 November 2010
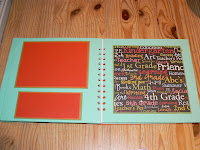
A Special Keepsake Album for JOE


Here is the basic layout outline for Joe's Friendship Album.It uses his favourite colour..red and 'school/grad days' design of DCWV cardstock.All 6 x 6 mounts have open tops so items can be stored inside and i'll be notching them so they look like like pockets and as you can see they are large enough on which to mount photo's if desired.The album is his mum's idea and such a super way of keepsaking for her son as his moves through a transition in life.
Friday, 19 November 2010
Completed New York Album
Monday, 15 November 2010
Christmas card making
I need time and inspiration for card making it's not my strong point................Two peas have 'it' here each Friday.
http//www.twopeasinabucket.com/events/11-holiday-cardmaking-weekends/
http//www.twopeasinabucket.com/events/11-holiday-cardmaking-weekends/
Sunday, 7 November 2010
Progress with our New York Album project.
Following the plan we had made i've now started a basic layout for each page using the photo's.

step 1. choose colour combination carefully to reflect colour in the photo's particularly like the hot pink in a skirt worn and this is key to this album being for the person wearing the pink!and the boys in their blues,greens and Khakis.So neutrals with black and a hint of hot pink throughout with a splash of designed paper that picks out the city backdrops and parks.Also a block layout in keeping with a geometric theme with just a hint of a journalling feel from adding a binding edging.All in keeping with what we discussed earlier to reflect the personality and sentiment the album hopes to hold.

step 2. Front Cover. Not yet complete but basics are there.....

step3.Mount photo's and provisionally layout basic pages.Keep it simple and ensure the elements can be moved around and adjusted as there is plenty more to add to the page!.

step 4. Add the key feature of 'the map' embellishment carefully matching each bit of new york to the page as planned......before embellishing any further.

step5. Carefully look at where the sentiment will go, stamp the sentiments and mount as appropriate.
step 6.add the paper and memorabilia distressing and inking/stmaping and tearing this pieces to give them a collage feel.Stick them underneath on the basic page...see it's a good job those initial photo's and layout elements were not stuck down in the first instance...but it was still important to know where they were going to lie! (this can be the fiddliest bit but it's important if you've a plan to in some way stick to it ...not always my strong point being a free flow creative! but i can do it especially when it's for someone else!)
more piccies to follow..................

step 1. choose colour combination carefully to reflect colour in the photo's particularly like the hot pink in a skirt worn and this is key to this album being for the person wearing the pink!and the boys in their blues,greens and Khakis.So neutrals with black and a hint of hot pink throughout with a splash of designed paper that picks out the city backdrops and parks.Also a block layout in keeping with a geometric theme with just a hint of a journalling feel from adding a binding edging.All in keeping with what we discussed earlier to reflect the personality and sentiment the album hopes to hold.

step 2. Front Cover. Not yet complete but basics are there.....

step3.Mount photo's and provisionally layout basic pages.Keep it simple and ensure the elements can be moved around and adjusted as there is plenty more to add to the page!.

step 4. Add the key feature of 'the map' embellishment carefully matching each bit of new york to the page as planned......before embellishing any further.

step5. Carefully look at where the sentiment will go, stamp the sentiments and mount as appropriate.
step 6.add the paper and memorabilia distressing and inking/stmaping and tearing this pieces to give them a collage feel.Stick them underneath on the basic page...see it's a good job those initial photo's and layout elements were not stuck down in the first instance...but it was still important to know where they were going to lie! (this can be the fiddliest bit but it's important if you've a plan to in some way stick to it ...not always my strong point being a free flow creative! but i can do it especially when it's for someone else!)
more piccies to follow..................
Subscribe to:
Comments (Atom)
